In case you missed it, I was over at FancyLittleThings.com Monday:
Are you ready for a super fun project?
I saw the original idea somewhere on pinterest, and kind of made it my own.
Durn I wish I could find that link!!
Supplies:
Large piece of cardboard
Driftwood
Scissors
Marker
Ruler
Hot Glue & Gun
Patience
Creative Mind
Preoccupied Husband
A few weeks ago husband and I went to the beach.
You can read about our fun time here.
I picked up a loot of driftwood for some
unknown project I was going to do.
I should have collected more, but
husband's hands and pockets filled fast.

To start...
you find a way to distract your husband.
...like telling him he should play video games
and trap your puppy....
[she did that on her own]
Now for the project...
you draw a star on your cardboard. Mine had a white and a brown side, so I did my drawing the white {wrong} side. This took patience, but you can download your template here, blow it up, and print it out.
If you decide to free hand {which i did} I suggest you draw a line down the middle.
But forreals, just don't free hand. It's a bad idea.
But forreals, just don't free hand. It's a bad idea.
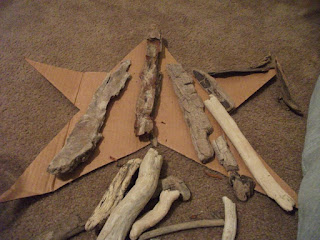
Once your star is cut out, turn it brown side up and piece together your driftwood. Start with your largest pieces first and fill in with your smaller pieces. This is the part where you use your patience. It is kinda frustrating, but hang it there. It's worth it.
I wish I had more smaller pieces... I actually broke apart
a few large pieces to make small ones.
Once you get it juuuust right TAKE A PICTURE. You will bump it and mess up your perfect geometric design. Having a picture handy is great!
Glue down your pieces. Hot glue worked just fine for me.
Driftwood is light. Once glued down, trim any cardboard that
may be showing near the edges...
I also had some seashells handy, and glued those on, too!!
I thought this would be great for a mantel design, or to sit on an
entry way table, but because husband and I are currently living in a
teeny apartment, it is so hard for me to get good pictures. This is the
best I could do. You get the idea ;)


9 comments:
Come link this project up at my place!!! Please? It's freakin amazing!
Very pretty! I have been wanting to do a driftwood project for awhile! I love this idea!
this is fantastic!!
you are so talented!!
so cute! Hey, would you like to do a guest post or tutorial on my blog? Just shoot me an email {teardrop@kc.rr.com}!
very cool project :)
firstly.. CUTE project. I totally love it! I think I need one of these in my beach theme bathroom!
Secondly OH MY GOSH you are SO funny! haha distract your hubby! LOL I do that too! :) Funny pic of hubby and trapped dog. LOL You crack me up! :)
LOVING the project! It turned out fabulous!
I'm having a giveaway on my blog to celebrate 50 followers. Come see.
http://craftmysoul.blogspot.com/2011/08/50-followers-giveaway.html
wow i lllove it. i need to be a little more hands on and try stuff like this!
Love it!! Happy I found your lovely blog. I'm following now. I invite you to stop by Katherines Corner. Giveaway will be announced tomorrow and our book club is currently reading Thin Rich Pretty.
Hugs
Post a Comment